Designing with Structural Thinking

In the old days, many of us learned to make web pages by first thinking about the “look” and what images, fonts, color schemes, and graphic design elements we would use to achieve it. We launched Photoshop or Fireworks and played with the look until we knew precisely (down to the pixel) what the page would look like. Once we had that plan, we began trying to make HTML create a pixel perfect rendering of the design.

If you want your HTML page to be web standards compliant and accessible you need to back off from thinking about “the look” first and begin your process by thinking about the semantic meaning and structure of the content your page will hold.

The look doesn’t matter

Before you faint and fall out of your chair over that statement, let me explain. A well-structured HTML page can look like absolutely anything. The CSS Zen Garden revolutionized web design by proving that a page of HTML can be made to look like absolutely anything. The CSS Zen Garden helped us finally get it: there is power in CSS that can be used to create any presentation whatsoever out of a simple page of HTML.

HTML is not just for the computer monitor anymore. That wonderful look you created in Photoshop or Fireworks might not work at all on a cell phone, or an aural screen reader. But a well-structured HTML page can go anywhere, work on any internet capable device, and be styled in a manner appropriate to the device with a CSS stylesheet.

Start Your Thinking

The starting point is structural. Some writers call it semantic. What those terms mean is that you need to think of your content as blocks of related meaning, or more simply, as content blocks. Think about the purpose your various content blocks will serve. Then design a semantic HTML structure that supports the meaning and purpose of your content.

If you sat down and planned out the structural bits and pieces you wanted on a web page, you might come up with a list like this.

  1. heading with logo and site name
  2. main page content
  3. global site navigation
  4. subsection navigation
  5. search form
  6. utility area with shopping cart and check out
  7. footer with legal stuff

The generic element used to provide structural context to a page of HTML is the div element. (That’s assuming you aren’t experimenting with HTML5, which has elements fitting many of these structures built in.) Using the div element with assigned ids for the structural parts of the page, your major structural content blocks could be:

<div id="header"></div>
<div id="content"></div>
<div id="globalnav"></div>
<div id="subnav"></div>
<div id="search"></div>
<div id="shop"></div>
<div id="footer"></div>

It isn’t a layout; it’s a structure. It’s the organization of information into content blocks. Once you understand what your structure needs to be, adding the appropriate content in the appropriate divisions of the page becomes automatic.

A div can contain anything, even another div. Your major content blocks will contain the HTML elements you need to create your page–headings, paragraphs, images, forms, lists, and so on.

By thinking first in terms of content, you now have structural HTML elements that can be positioned and styled in any place on the page and in any way you want. Each of those content blocks in your HTML can be individually placed on the page, and assigned colors, fonts, margins, backgrounds, padding, or alignment rules.

This information was rewritten from an earlier much longer article published at the Wise-Women.org site called The Early Bird Catches the CSS: Planning Structural HTML.

How to Nuture Web Pages for Growth

Give every page the minimum nutrients for proper growth.

  • Every page needs a descriptive title. The title should give the name of the site and the page contents something like this: How to Nuture Your Web Pages: Web Teacher.
  • Every page needs headings and information that explain what the page is about.
  • The page content must be focused and clear and contain keywords that help machines like search engines identify the topic of the content.

Titles, headings, and page content are used by the search engines to index your pages. If you want to be found by someone who might search on your topic use all three. I don’t know if this approach will work if you are waiting for Prince Charming (or Princess Charming) to find you, but it works for web surfers.

6 Tips for Hiring a Web Designer

If you are a small business person looking to hire a web designer here are some things you need to think about. Some are things you need to have thought out before you begin, some deal with finding the right person for the job.

  1. Domain name. The domain name is the word after the www in your internet address. There is a cost for this.
  2. Hosting. A web site needs a server, also called a hosting company, who charge you to serve or host your web site. The charge can vary from around $20 a month up into the hundreds of dollars a month depending on your site.
  3. Content. You will have to provide the information that the designer puts in the website. This might be images, text, keyword ideas for search engine success or something else. You have to commit the time to put all this together.
  4. A goal. You have to be clear about what you want the site to do and be. Why do you need the site? Be ready to communicate this to the designer so that the site can be created to achieve that goal.
  5. A contract. Deal with someone who is a professional. Sign a contract. It gives both parties, you and the designer, a legal basis for doing business. Make sure you know how much you will be charged for the work. Some designers charge by the hour, some by the job. Many ask you to pay half or a third of the price upfront, so be prepared to do that. If you want changes after the original specifications are agreed to and the contract is signed, it may mean additional costs.
  6. It’s business. You are doing business with someone. Don’t expect free services, such as examples of what the designer would do with your site before you’ll agree to hire them or before you pay them any money. Imagine that you own a women’s clothing store. Would youlet me walk into your store and ask for eight or ten dresses free so I can be sure I like the way they look, because if I did, then I might come back and really buy a dress from you?

Style Fieldsets like a Pro

Just a few CSS rules can make your fieldset look like it was styled by a pro. A fieldset is used to organize forms into sections that can be identified with labels called legends. We’re going to start this discussion looking at a fieldset with no legend. We’ll get to legends in a bit.

Here’s a fieldset with no styling as displayed in the Firefox browser.

unstyled fieldset in Firefox

The default Firefox fieldset is a gray border around the enclosed form fields. I’ll start with the border. This rule will change the make it solid, 2 pixels in width, and a dark blue.

fieldset {
border: 2px solid #00F;
}

This changes the appearance:fieldset with a blue 2px border

Any border width, style or color could be used. Next, I’ll round the corners. Use the border-radius property for that.

fieldset {
border: 2px solid #00F;
border-radius: 8px;
}

In Firefox, you now see this.

the fieldset with rounded corners

I want to change the alignment in the form. That has nothing to do with the fieldset, but it will look better if the fields align. This is the rule added.

label {
padding: 3px;
display: block;
}

The new appearance.

the form with some style added to the labels

Many rules can be applied to the label element. Color, font, and other aspects of the label appearance can be styled.

There are still many things that can be styled about the fieldset. Width, background-color, background-image and others. Here’s the fieldset with a gradient background image added to the fieldset rule.

fieldset {
border: 2px solid #00F;
border-radius: 8px;
background: url(fieldsetbg.jpg) no-repeat left top;
}

The effect is this.

the fieldset with a background image

What about legends?

Web Teacher reviewed Fancy Form Design a few days ago. One of the things I learned in that fine little book is that screen readers such as JAWS announce the fieldset legend anew for each new field in the fieldset. The example in Fancy Form Design uses a fieldset with the legend “Change Password” and fields labeled “Current Password” and “New Password.” The authors pointed out that hearing the screen reader say “Change Password” before each of the form labels can be quite a lot of listening to the word “password.” As the authors also pointed out, not every screen reader even announces the legend at all.

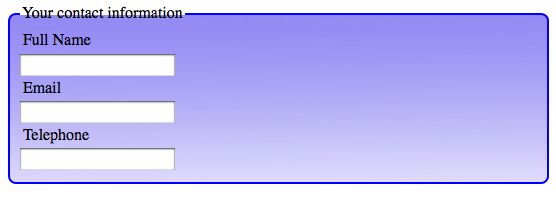
Before I explain the solution from Fancy Form Design, here’s how the fieldset would look with an unstyled legend added.

the fieldset with a legend

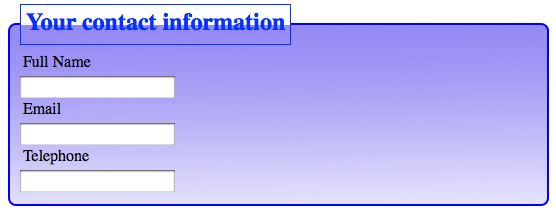
So you’ll see what some of the possibilities are with styling a legend, I’ll show you a legend with the following rule applied.

legend {
font-weight: bold;
font-size: 1.5em;
color: #03F;
border: 1px solid #03F;
padding: 5px;
}

Here’s how it looks.

the fieldset legend with CSS styles added

Much more can be done to the legend with CSS. For example, the corners could be rounded, the background could be styled, the font could be changed, and so on.

For this example form, I don’t think it would be too much for a screen reader to announce, “Your contact information, full name” followed by “Your contact information, email,” and “Your contact information, telephone.” I might decide to use the legend here.

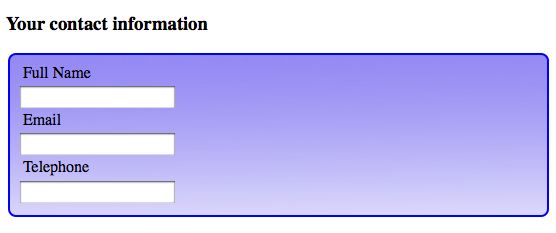
In Fancy Form Design, the authors suggest using a heading before the fieldset, rather than using a legend in the fieldset. With a heading rather than a legend, the screen reader would read the heading just once. Visually, it still makes sense. Here it is with an unstyled h3 element.

the fieldset with a heading

My advice is to decide whether or not a legend makes sense on a case-by-case basis.

Conclusion

You can style a fieldset like a pro when you realize that everything you know about CSS can be applied to the elements, classes and ids that exist as hooks for CSS rules within the HTML used to construct the form. Everything you know about styling fonts, colors, backgrounds, borders, padding, margin, width, display, and other CSS properties can be applied to styling fieldsets.

See also:

Should your blog have an hCard?

What’s an hCard, you ask? It’s a digital version of a business card. You put it on your blog or website and it provides your name, your contact information and other information you want people to know. Because it’s digital, it can be exported from your web page to an address book and synched to a mobile phone. Google and Yahoo! both index information in hCards, so it gives you some search engine clout as well as providing portable contact information to your blog’s users.

You can provide only your name in an hCard, or you can give a physical address and phone number. If you are running a brick and mortar business, letting your customers have your phone number and address on their mobile phones might be a smart move. If you aren’t selling something at a physical location, you might just want to include your name, perhaps your URLs or an email contact.

Before you learn how to make an hCard, look at some in action. hCards are a particular type of HTML code called a microformat. A Blog Not Limited is the home of the queen of microformats, Emily Lewis. Scroll to the bottom of her page and look at that material where is says, “The Coolest Person I Know.” That information, which includes Emily’s name, email, and location is wrapped up in HTML behind the scenes that makes it an hCard. The hCard can be exported from her web page and saved as a contact. Emily wrote a book about microformats—Microformats Made Simple—and numerous blog posts on the topic. Here’s her post describing everything you’d ever need to know about hCard.

Here’s another blog with an hCard: New England Living. This blog uses the hCard in the footer of each post, and identifies only the post author’s full name as Alyson (New England Living). This isn’t the only blog I’ve seen with an hCard microformat in the post footers. It makes sense in each post footer if the blog has more than one author. If your blog has a single author, I think it would be much better placed on the page’s footer for each page of the blog. I have an hCard in the footer of my blog that simply provides my real name and a link to my sadly neglected site at vdebolt.com

Look at New Parent’s About Us page. Here is all the business information you would put in a full-blown hCard, but it isn’t in one. This is a place where an hCard would be very valuable. Or here, at the Austin Real Estate News and Advice Blog. The realtor’s name and phone number is given right there in the blog’s header, but there’s no downloadable hCard with the info that can be synched with a mobile phone. A realtor’s blog is a perfect spot for an hCard.

Ready to make one? The easiest way is to go to Microformats.org hCard Creator and fill in the form. As you add your information to the form fields, the HTML is generated beside it. Only fill in the fields for the information you want to share. Copy and paste the HTML into your blog in an appropriate place. An appropriate place might be the page footer or an About page. (Feel free to leave out that last line about the hCard Creator when you use the code.)

When you examine the code, you see that most of the magic is done by using various classes to define your data. You don’t really need to know why the microformat class is called “vcard” instead of “hcard,” but if you are interested in the reason, the article I mentioned by Emily Lewis tells you all about it. If you are geeky enough to make your own hCard by hand instead of using the hCard Creator, Emily’s article is the place to learn all the details.

How do you find and download hCards that are on web pages? The easiest way is to use the Operator Add-on in Firefox. When an hCard (or several other types of microformats) are on a web page, the Operator toolbar lets you know and has a menu option to view or export the information.

If you visit this page at A Blog Not Limited with the Operator Toolbar working in Firefox, you see three contacts.

export contacts menu

One or all of the contacts can be exported to your address book and synched to your mobile phone.

The Operator toolbar also shows other microformats on the page. The image above shows: Events(2). hEvents can be exported, too, and added to your calendar. Microformats have many handy uses besides contact information via hCards.

If you are running a business with your blog, I think you need an hCard. If you are using your blog for other reasons, you need to decide for yourself how important having your contact information in an hCard format is to you.

Cross posted at BlogHer.

The optgroup in HTML select forms in Dreamweaver

I recently showed how to use optgroup in HTML select forms. Those instructions were for hand coders. Today’s instructions show you how to make a small select form with optgroups in Dreamweaver. This is what the finished form element looks like in the browser.

browserOptgroup

Here’s how you do it if you use Dreamweaver. The following screen shots are from Dreamweaver CS4, but previous recent versions of Dreamweaver will work in a similar way.

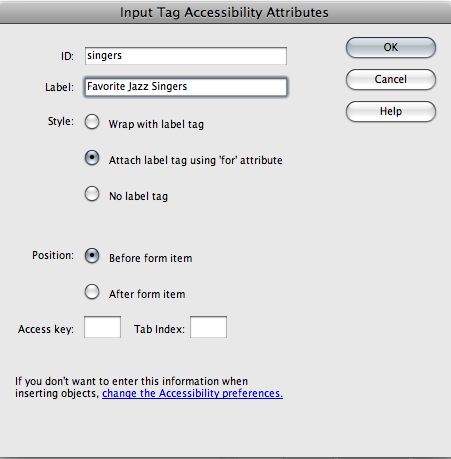
In Dreamweaver, start by selecting the Forms category from the Insert panel. Choose the icon for List/Menu. Fill in the id for the form element and give the menu a Label. Select Attach label tag using ‘for’ attribute. If you don’t see this accessibility window, you need to go into your Preferences and select all the Accessibility options you can to automatically appear when appropriate.

InputTagAccessibilityAttributes

When the form element appears in the document, select it and click List Values in the Properties panel. Add the various labels and values for your select menu. Click OK.

ListValues

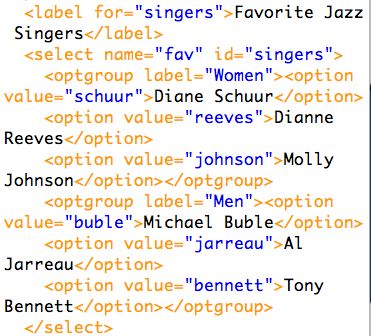
Select either Split or Code View to look at the code. At this point, you have the following code.

selectCodeView

I changed the value for name to “fav.” Dreamweaver assigns the value “singers” to both name and id automatically. It’s okay to change the value of name, but be sure that the value of for and the value of id are exactly the same.

Dreamweaver doesn’t have an icon for optgroup in the Form panel. So you have two choices. You can go into Code View and type the optgroup tags in your select element. If you are comfortable doing that, it’s the quickest way to make it happen.

If you don’t like typing in Code View, here are the steps. You still need to see the code. Use Split View. Highlight the three options that are women. (You can see an image of the men’s names highlighted below.) With the women options highlighted, Choose Insert Tag. In the Tag Chooser window, select HTML tags > Forms > optgroup. Click Insert.

insertOptgroup

You will be asked to create a Label for the optgroup. Type Women. Click OK.

tag-editor-optgroup

Repeat the process by highlighting the options for men in the code.

highlightMen

Again, choose Insert Tag. In the Tag Chooser window, select HTML tags > Forms > optgroup. Click Insert. This time, when the Tag Editor for optgroup appears, type “Men” in the form and click OK. The completed select menu looks like this in Code view:

completed-select-menu

You’ve finished inserting the optgroup, so you can click back into Design view and complete your form in Design view.

The optgroup in HTML select forms

You are probably familiar with form elements that list all 50 states or numerous country codes. These forms are constructed with select menus. Using optgroup, you can create categories within a select menu to help organize the menu. Here’s an example of a select menu that lets you pick favorite jazz singers, with the choices organized by gender. The optgroup label appears in the menu when it is displayed on a web page.

<label for="singers">Favorite Jazz Singers</label>
<select name="fav" id="singers" multiple="multiple">
<optgroup label="Women">
<option value="schuur">Diane Schuur</option>
<option value="reeves">Dianne Reeves</option>
<option vlaue="johnson">Molly Johnson</option>
</optgroup>
<optgroup label="Men">
<option value="buble">Michael Buble</option>
<option value="jarreau">Al Jarreau</option>
<option value="bennett">Tony Bennett</option>
</optgroup>
</select>

The select element allows for more than one choice with the attribute multiple="multiple". When allowing more than one choice, it’s wise to instruct your users about how to do that. A brief note that more than one selection can be made by holding down the Ctrl or Cmd key while selecting is all that is needed.

If you are not a hand coder and need directions for how to use optgroup in Dreamweaver, see this post: The optgroup in HTML select forms in Dreamweaver.