Working with rem in CSS

Working with rem in CSS

Is the relative measure rem new to you? Most people are familiar with the em unit of measure, but the rem hasn’t been around quite as long. It came into being with CSS3.

The definition of rem is “root relative em.” So a rem is really nothing new, it’s merely an em living in a very close relationship with the page root – typically the html element.

The default font size in most browsers is 16px. We equate this with a font-size value of 100% or 1em or 1rem. These are the relative font units used for responsive web pages.

To repeat, a rem is relative to the root. Why is this so important? Because an em bases font-size on the element it’s used on, and those sizes are inherited. For example, if a ul had a declared font-size of 0.75em, a nested ul within that list would have a font-size of 0.75em of the parent list.

On the other hand, if a rule for ul set the font-size at 0.75rem, any nested list would remain at that 0.75rem size because it is root relative, not relative to the parent element.

Browser support for the rem is very good among modern browsers. Why not give rem a try?

Attribute Selectors: All the Bells and Whistles

There are many types of selectors in CSS. If you’re still making your way through the darkness with nothing more than a few element selectors, a few classes, some ids, and the occasional pseudo selector, you need to find your way into the light with attribute selectors.

I wrote about Attribute Selectors in CSS back in 2008, but there are 3 new types of attribute selectors in CSS3. And they have good browser support.

Attribute Selector Basics

The basic syntax is to name an element, with an attribute in brackets following it, then give the CSS rule.

element[attribute] {
some rules here;
}

This rule, for example, would target any image with a title attribute.

img[title] {
some rules here;
}

This rule would target any anchor element with an href attribute.

a[href] {
some rules here;
}

Beyond that basic type of attribute selector, there are several operators can can be used to refine or broaden what you are selecting.

Using an equals sign, you can add specific values to the chosen attributes, making the selector even more precise. For example,

img[title="mybunny"] {
some rules here;
}

a[href="http://blogher.com"] {
some rules here;
}

The first example would select any image with the exact title attribute “mybunny.” The second would choose any link going to exactly “http://blogher.com,” but not to, say, “http://blogher.com/tech.”

The ~= operator select elements with an attribute value containing a specified word.

i [lang~="en"] {
some rules here;
}

This would match any italic element with a language attribute of English.

The |= uses the syntax |= to match hyphenated elements. This most often is used in rules targeting specific language declarations, where you might have hyphenated attributes in an HTML element such as en-US or en-GB. An example selector is:

body [lang|="en"]{
some rules here;
}

New in CSS3

The ^= operator uses the caret (^) with the equals sign to select what something begins with. It will match elements that have an attribute containing a value that starts with the specified value. For example,

a[href^="https:"] {
some rules here;
}

That selector would match only anchor elements with an href that began with https:.

The *= operator will match elements that have an attribute which contains the specified value somewhere in the attribute value. For example,

a[href*="blogher.com"] {
some rules here;
}

That would select any anchor element with an href value that contained blogher.com somewhere. This gives you a much wider sweep than the simple = operator.

Finally, the $= operator uses the dollar sign ($), which matches to elements that have a  specified value at the end. Examples:

img[src$=".gif"] {
some rules here;
}

a[href$=".doc"] {
some rules here;
}

These two examples would select only image elements ending with .gif or only href attributes ending in .doc.

Summary: How to Apply WCAG 2.0 to Mobile Devices

This slideshow requires JavaScript.

This post simply serves as a summary of the 4 posts published recently that distill the information from the W3C about how the guidelines and principles of WCAG 2.0 apply to mobile devices.

I thought it would be useful to have a single post with links to each of the previous posts. The posts take the 4 POUR principles and explain what they mean in terms of mobile application.

POUR

Twitter Tip: The List vs. The Follow

Follows vs. followers: a twitter tip

About a year ago I started a new pop culture/entertainment blog called Old Ain’t Dead. I started a new Twitter account for it as well @OldAintDead.

In the service of my new topic, I wanted to follow the tweets of many people and sources who write about entertainment and the stars making the pop culture news.

I also wanted to get people to follow my new Twitter account. A much harder proposition. It’s a slower process to get followers than it is to find people to follow.

I didn’t want the numbers to be out of proportion when potential new followers looked at my twitter profile. My regular Twitter account, where I tweet about web design topics, is @vdebolt. There I have more followers than people I follow.

twitter profile for @vdebolt
Having more followers than accounts I follow looks okay.

It’s great to have lots of followers in proportion to the number you are following. Makes you look interesting.

But what about the @OldAintDead Twitter account. If I were following 2000 entertainment accounts and only 412 people were following me, it would look as if over 1500 people decided not to follow me back. Someone seeing my profile would think I’m not worth following.

Screen grab of my Twitter Profile
The proportion of following to followers is fairly equal because I put public figures in a list.

My numbers are about equal now. That’s okay with me. So how did I manage to keep track of people I want to follow without actually following them?

I used a list. I took all those people and organizations I wanted to read like @Variety and @ShondaRhimes – people who would never follow me back – and I put them in a list. I called the list #mediawelike. I put actors, shows, media sites, networks, and those kinds of accounts in the list.

For my @OldAintDead Twitter feed, I follow real people who follow back, people who sometimes read my blog and people who are willing to engage in a conversation about something on Twitter.

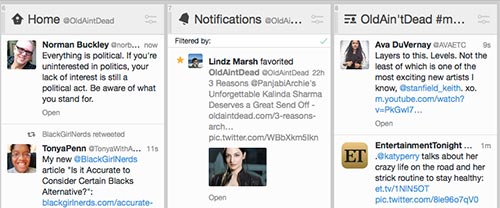
I use Tweetdeck for watching Twitter in a browser. On my phone, I use Hootsuite. (Hootsuite doesn’t have an option for viewing lists.) Here’s what I see in my Old Ain’t Dead Twitter feed in Tweetdeck.

A screen grab from Tweetdeck
The Old Ain’t Dead Twitter feed

You see my Home feed, which is where I see the accounts I follow. I also keep open a notifications column. You also see the column for tweets coming in to the #mediawelike list. By using the list, I can keep the number of people I follow in a reasonable ratio compared to the number who follow me.

Creating a list is simple. In a browser, go to the Lists tab on your profile page. The create a new list option can be found there.

The new list button
The new list button

Makin’ a list and checkin’ it twice. Gonna find out who’s naughty and nice. No, wait. Wrong song.

Just go make a list.

The Basics of Choosing and Obtaining a Domain Name

Thinking of starting a new website? Two preliminary steps are choosing a domain name for your new site and then buying that domain name. Let’s take a look at some of the basics involved in that process.

Choosing a Domain Name

A good domain name is easy to remember and easy to spell. A domain name that’s easy to spell shouldn’t have characters like hyphens between words. It you want more than one word in the name, run them together like alistapart.com or webstandardssherpa.com. It’s a bit awkward to read, but for someone typing the domain name for A List Apart or Web Standards Sherpa in the location bar of a browser, it makes perfect sense.

Are you starting a website for an established business? Try to make the name reflect the business name and the branding that is already in place for the business. This may be a bit hard if it’s a commonly used name. For example, a Denver floor tile company might have trouble getting the name mountaintile.com. But perhaps denvermountaintile.com might be available.

If it’s a personal website, try to use your name. Karen McGrane owns karenmcgrane.com. How simple is that?

If it’s a blog where you’ll be exploring a particular point of view, pick a domain name that reflects your point of view. A name like Mountain Poet or Lesbian Dad tells you a story about what you can expect from the website before you’ve even visited.

Before you seek out a place to purchase the domain name, it’s good to have a few ideas ready to go. Your first choice might not be available.

Obtaining a Domain Name

Okay, you’ve got some ideas for a great domain name. It’s time to see what’s available for purchase.

There are literally thousands of places where you can buy a domain name. I use the domain name services connected to the hosting company where I do business. I like having the domain name company and the web hosting company connected. But I know people who think this is a bad idea. I think the reasoning of the people who think it’s a bad idea is that if one company shuts down suddenly, at least the other one still operates. If you choose an established company with a good history, I don’t think it’s something you need to worry about.

If you search for domain names on Google you get 84,000,000 results. There are a lot of choices! I’ll just pick one to use as an example. This does not imply that I endorse this company, it’s just an example. Also, prices vary, so the prices you see in these examples may be different from other domain name sellers.

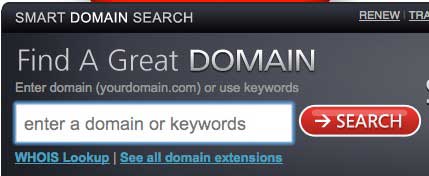
A typical domain name search form.

At domain.com, you see something similar to what you see on any site where you want to purchase a domain name. You enter the name you are hoping to purchase. The site will tell you if the name is available. If it’s not available exactly as you want it, the site will suggest alternatives that are close to what you want.

I searched for vdebolt.com, my own domain name. Here’s what the tool told me.

The .com is gone, but other top level domains for that name are available.

I can’t buy vdebolt.com (duh, I already own it) but other top level domain name types are available like vdebolt.net or vdebolt.org. (Domain names are cheap. Many people buy several variations and direct them all to one site.)

If the name you want isn’t available, choosing whether or not to go with a .net or .org or some other .whatever is an option.

If you don’t want the .org or .net or .whatever, the tools usually suggest variations of the name based on your original search. Here are a few suggested to me:

A few of the suggested variations on my domain name.

Even better, create your own variations like the denvermountaintile.com example and use the search tool to see if it is available.

If you can’t get a name close to what you originally wanted, go back to step one and brainstorm a new idea. Keep trying until you eventually find a name that will work and is available.

You can buy the name for 1 year or for several. You’ll probably save a few dollars if you buy several years at a time. Don’t forget to renew it on time, or you might lose it!

You’re all set. Go build something awesome.

[Note: This post was originally published on Blogher.com.]

Accessibility Teaching Materials: Free Download

Accessibility Teaching Resources
A free booklet for web educators

I prepared a booklet (PDF) of materials that I use to teach a short class in web accessibility. There really isn’t a great resource for a class in web accessibility that covers the basics in just a few hours. I took some of my handouts and made such a resource for you. It’s a free download.

Get Accessibility Teaching Resources now. Free!

Using Clearfix to Clear Floats in a Layout

First, let’s review some of the older methods of clearing floats in a layout. In a CSS layout with two or more columns, there is generally some use of float to create the column structure. For the layout to include a footer at the bottom of the page, those floats need to be cleared.

A technique used some time back was to add some element – a br or a div – with a class attached that applied clear:both. This br or div was inserted immediately after the elements that needed clearing. This element added no content, it simply cleared the float (or floats). This works, but it does add an unnecessary element into the HTML content.

Another technique put a clear:both rule in the element following the float (or floats) preceding it. So a footer element might be set to clear:both to move it below any floated elements above it. This works. It puts the clear after the elements that need to be cleared.

Example code for this type of clearing in a two column layout.

<div class="container">
 <header>
 . . .
 </header>
 <main>
 . . .
 </main>
 <div class="sidebar">
 . . .
 </div>
 <footer><!--clear:both rule applied to footer-->
 . . .
 </footer>
</div>

Clearfix

The .clearfix difference is that the class is applied to the parent element containing the floats. The parent element becomes self-clearing.

An advantage of using .clearfix is that it makes the container div height equal to the tallest of the floated columns enclosed. This gives you options with borders, backgrounds and more, particularly when all of the contained elements are floated.

Using .clearfix generally will require the addition of another wrapper div to the HTML. Here’s a example similar to the one above, but designed for .clearfix. The header and footer elements are outside the wrapper div which contains the floated columns.

<div class="container">
<header>
. . .
</header>
 <div class="wrapper"><!--.clearfix class applied to wrapper-->
 <main>
 . . .
 </main>
 <div class="sidebar">
 . . .
 </div>
 </div><!--end wrapper div-->
<footer>
. . .
</footer>
</div><!--end of container div-->

The Clearfix Rule

The CSS for a .clearfix class rule is applied to the parent element containing the floats. It uses the pseudo class :after with no content. It declares the element as display:table.

.clearfix:after {
  content: "";
  display: table;
  clear: both;
}

That’s it.